How To Setup Email on iPhone and iPad

Email has been around for quite some time already and we can say for sure that it was the first online communication medium to be ever invented but with the emergence of social media platforms, the notion of communication has been completely transformed. However, these platforms could not replace email technology and it is still prevalent in allowing us to keep in touch with people across the globe.
Whether you own an iPhone or an iPad, you need to follow certain steps to access your Apple Mail. The steps involved in setting up your account are simple and easy to follow. We will also discuss some additional information regarding how you can manage your mail settings on your iOS device.
Here are the following steps to how you can set up your email account on iPhone and iPad:
Automatically add email accounts
With the new iOS 12 update, you can set up more than one email accounts on your iPhone or iPad. You can do it either manually or automatically but since the automatic approach is the simplest one, we will commence explaining its steps first.
Whether it is an iCloud, Google or GSuite alternative or Microsoft email, you can set up either of these email accounts on your Apple device. Once you have decided the email of your choice, the next step is related to your iPhone or iPad’s settings.
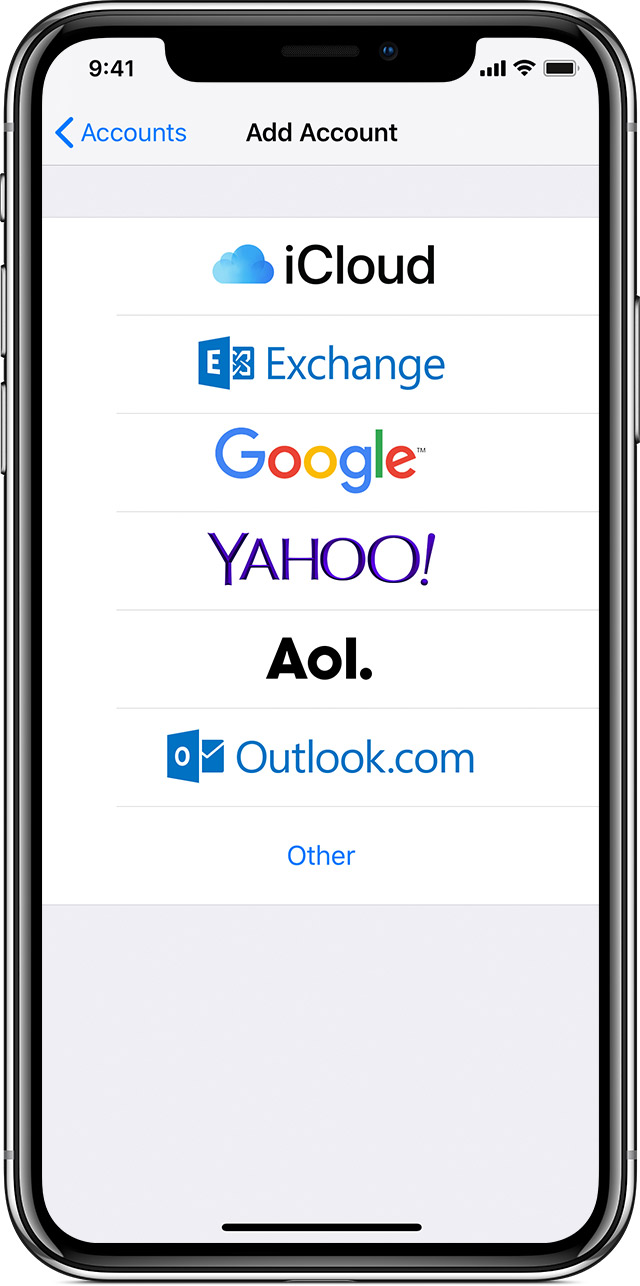
Go to the “Settings” option and then select “Password & Accounts”. A page with the option to “Add Account” will be displayed to you. Tap this option and from the list of email providers, select the email provider of your choice. Enter the details of your email account and then click “Next” to proceed to the rest of the steps.
Setting up Contacts, Calendars, and additional features
Once you have added your email account, you can even incorporate your contacts or calendars with your account. This can be done by selecting the apps of your choice and doing so will make them available on your device.
Supposedly, you added your Gmail and you want your Google Calendar data on your Apple Calendar. You can sync both of these calendars to your iPhone or iPad using the aforementioned details.
Simply save the settings and you have automatically set up your email account automatically.
Manually add email accounts
Another scenario could be that your email provider is not in the default list of email accounts. If that is the case, you can opt for the manual approach. While the address and password of your email are essential for this approach but you also need to know the incoming mail server and outgoing mail server to set up your account.
You might think this step is confusing but it is not. You can get the details from your email provider directly or you can search for it on Google and set it up accordingly.
Once that is done, simply go to “Settings” and then proceed with the “Password & Accounts” tab then to the “Add Account” option. However, select “Other” from the list this time.
Add your email and password and then click onto “Next” to proceed further. All of your provided details will be then added but in case they are not then you will be displayed a page where you can add them.
There are two options given to you for choosing either a POP or an IMAP account. Enter the details required for the fields shown on the page. Once you have, select “Next” and then save them. You will start receiving messages and emails on your Mail app in no time.
Sending an email from your iPhone or iPad device
After you are done with setting up your email account, it is better to check if you are able to send or receive emails from your contacts.
To check, tap your “Mail” app then select “Write” to create a new email. Simply, add the email address of the person you are sending the people to and add a subject (optional) in the given field. Type your message and then proceed to the next step.
Once you have written your message, it is time to send it to your desired recipient. If you have added multiple email accounts then in the “From” field, select the email address of your choice and then click on to the “Send” button.
If the message is sent without any error notification popups then you have successfully set up your email account.
Information on managing Mail settings
Setting up an email account is not the only concern of Apple users instead, you should also know how to manage and customize your account settings according to your preferences. There is a lot more you have to know about the customization and personalization of the Mail app of your iPhone or iPad.
Receiving notifications
What if someone replies to your email but you are not notified? What to do then? Go to the “Settings” option, click on to “Notifications” option, and then select “Mail. The next step is to enable the option of “Allow Notifications”. You can enable or disable this option whenever you want to but it is a great feature to customize the notification sound, icons the display of your notifications as well.
Manage email accounts
Managing email accounts is simpler than how most individuals consider it to be. Access the “Settings” app on the main screen of your phone. Navigate to “Accounts & Passwords” and then select the account you want to manage. You can make changes and adjustments to your chosen account according to your liking.
Mail preview display
You can even customize how you want your text message or email to be previewed on the screen. Go to the “Settings” page and select “Mail”. The further settings will have the option of “Preview” and you can change the preview display of your message’s content.

Get A Free Consultation Today!
Discuss your app idea with our consultants and we'll help you transform them to multi-million dollar reality.
You May Also like
- Technology November 12, 2021
10 Things In iPhone You Should Know Today
The latest iPhone models are none other than the iPhone XR, XS, and the XS Max. These models have been equipped with the upcoming yet innovational features that smartphones of other brands do not poss...
- iOS January 9, 2019
How to use Reachability on iPhone XS Max – Steps Define
iPhones have earned the position among the world’s most high-tech and innovational smartphones. With continuous updates in the features and functionalities, Apple once again brought to us three enti...


